Having not installed arch linux for some time, I was kind of surprised that the installer got abolished and replaced with pacstrap. Simon Dittlmann did a great job describing an encrypted setup on arch linux, but his guide is a bit outdated.
I couldn’t find a guide utilizing the current method of installing arch linux, so I decided to update Simon’s guide to 2013. I’ll explain setting up LVM on top of an encrypted partition, because it’s easier and more convenient than the other way round.
Advice: You should definitely backup your data and read the Beginner’s Guide to get comfortable with the installation process.
Step 0: Preparing the hard drive
First of all we should overwrite the whole hard drive with random data to wipe everything that’s been on there before. It’s not necessary to encrypt your system, but it prevents potential attackers from retrieving old data from the drive. This step is entirely optional.
To overwrite the drive type in:
# dd if=/dev/urandom of=/dev/HARDDRIVEDepending on the size of the drive, this process may take a while so be patient. And with ‘a while’ I mean hours and hours of dreadful waiting, because dd doesn’t provide any output until it’s done and even small sized hard drives will take a long time to be processed (e.g. ~7h for 250GB). After that we have to prepare a /boot partition (~150-200MB), which will be left unencrypted, and a partition for LVM.
I’m using the good ol' MBR here, because my BIOS doesn’t like GPT. The tool of choice for partitioning the drive therefore is cfdisk. Be sure to set the bootable flag for the boot partition and don’t forget to write your changes to disk.
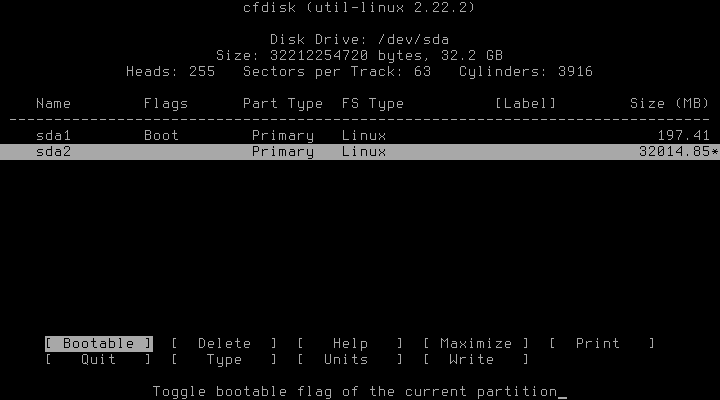
From now on, /dev/sda1 will be the boot partition and /dev/sda2 the to be encrypted partition with the LVM.
Step 1: Setting up the encrypted partition
We’ll encrypt the full /dev/sda2 partition using a passphrase, thus the encryption is pretty straight forward:
It might not be necessary to load the kernel module explicitly, but better safe than sorry:
# modprobe dm_cryptNow we encrypt the whole partition with our encryption algorithm of choice:
# cryptsetup -c aes-xts-plain64 -s 512 -h sha512 -i 5000 -y luksFormat /dev/sda2In detail:
-c specifies the algorithm (here AES with XTS)
-s specifies the length of the encryption key
   (XTS uses two keys, therefore the key size here is 256)
-h specifies the hashing algorithm
-i specifies the number of milliseconds to spend with PBKDF2 passphrase processing
   (our hashing algorithm is stronger than sha1, thus this number should be higher
   than the default 1000)
-y asks for the passphrase two times (as confirmation)
To check if everything went right, we can dump the header information of the new encrypted partition with
# cryptsetup luksDump /dev/sda2The command should for example display some information about the used algorithms
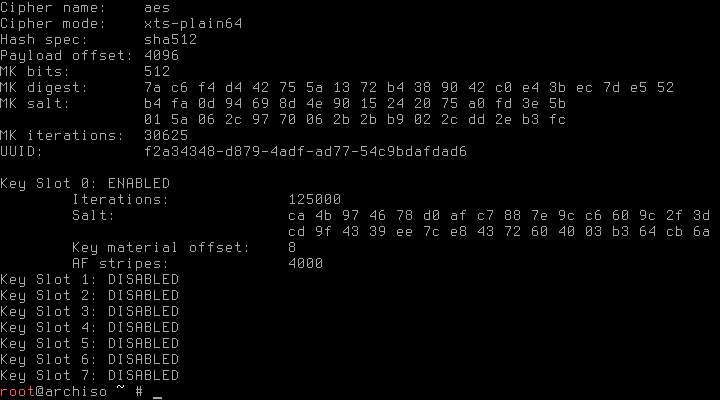
Finally, we open the encrypted partition to start setting up the LVM with
# cryptsetup luksOpen /dev/sda2 cryptwhich will make the new partition available as /dev/mapper/crypt.
Step 2: Setting up LVM
First of all we have to initialize the physical volume and create a volume group:
# lvm pvcreate /dev/mapper/crypt
# lvm vgcreate lvmpool /dev/mapper/crypt
The following commands are just an example and should be adjusted to your needs. I strongly advice to separate /root and /home, the swap partition might be optional if you have enough RAM. To create a new logical volume lvm lvcreate is used:
# lvm lvcreate -L 10GB -n root lvmpool
# lvm lvcreate -L 1GB -n swap lvmpool
# lvm lvcreate -l 100%FREE -n home lvmpool
To check if everything went right, we can use the command lvm lvs
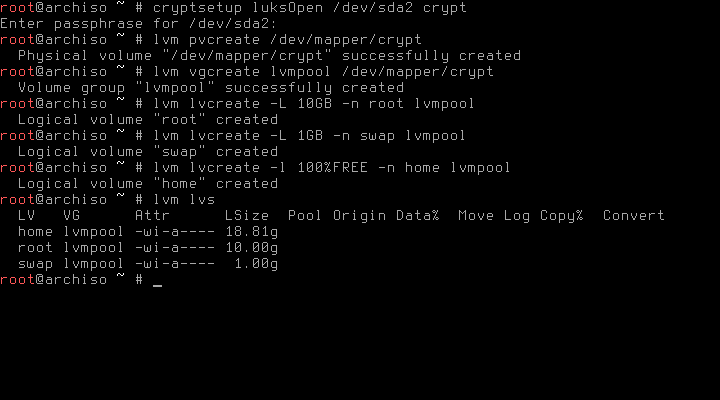
If it doesn’t look like it’s supposed to be, lvm lvremove <volume name> lets you easily delete logical volumes and start over again.
Step 3: Installing Arch Linux
First of all we have to format our new partitions. I’ll use ext4 for everything, you might have to adjust the following commands if you want something else. Don’t forget /boot and swap!
# mkfs.ext4 /dev/sda1
# mkfs.ext4 /dev/mapper/lvmpool-root
# mkfs.ext4 /dev/mapper/lvmpool-home
# mkswap /dev/mapper/lvmpool-swap
# swapon /dev/mapper/lvmpool-swap
Now we can install the base system according to the Beginner’s Guide. Don’t forget that the /root and /home partition are at /dev/mapper/lvmpool-{root,home}!

After the generation of the fstab, we should check if the entries for the lvm volumes are correct
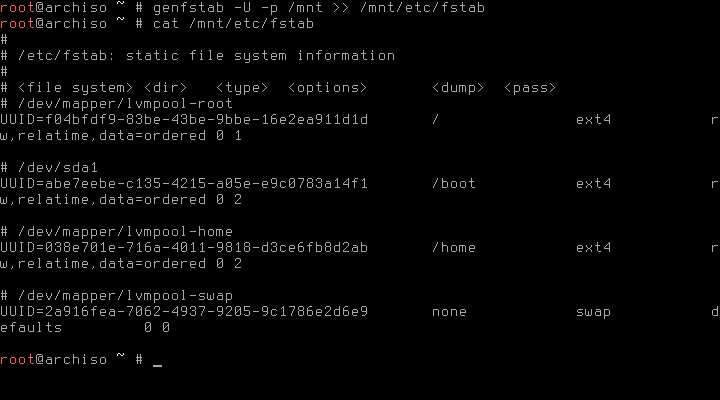
Step 4: Configuration
Before generating the ramdisk, we have to add the appropriate hooks to the mkinitcpio.conf
HOOKS="base udev autodetect modconf block keymap encrypt lvm2 filesystems keyboard fsck"The keymap hook is only necessary if you changed the keyboard layout prior to the creation of the encrypted partition. The encrypt hook has to be loaded before the lvm2 hook! After that we can create the new ramdisk with
# mkinitcpio -p linuxAfter installing the bootloader of choice (I’m using syslinux), we have to adjust its configuration, too. In /boot/syslinux/syslinux.cfg, the two APPEND entries for arch and archfallback have to be changed to
APPEND root=/dev/mapper/lvmpool-root cryptdevice=/dev/sda2:crypt ro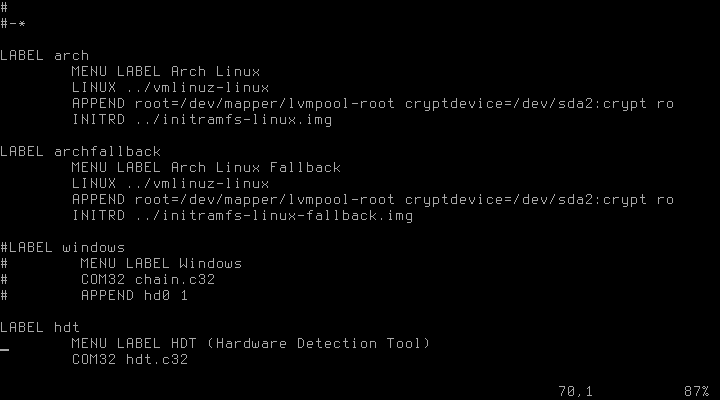
The according entries for GRUB can be found in the ArchWiki.
That’s it! No further configuration needed. After unmounting all partitions and a subsequent reboot you should be greated with a password prompt to your new installation. Oh Yeah! password prompt after reboot
And never forget

(Source: http://xkcd.com/538/)
Further readings
2013-03-24: Fixed error in the luksOpen command, thanks to Aaron Rea
2013-03-24: Added a hint to the time it takes for dd to run through,
            thanks to Joonas Lipping
2017-05-22: Ported content to hugo