There are many guides out there explaining how to do a full-system encryption on Linux, but most of them, including my own, have a little flaw: They focus on systems with exactly one hard drive. However nowadays hard disks are cheap, SSD+HDD combinations are getting more popular and even some notebooks (like my glorious Thinkpad T520) have multiple drives.
Although it’s not that difficult to adapt those guides in a way that all drive are encrypted, naive double execution of cryptsetup will lead to being asked for a passphrase multiple times at boot. I find this behaviour highly annoying and will therefore explain how to circumvent this situation without omitting security.
Advice: You should be familiar with the installation process of Arch Linux and the setup of an encrypted system. Otherwise I suggest reading the Beginner’s Guide and my encryption guide first.
Step 0: Preparing the hard drives
First step after having overwritten the drives with random data (maybe) is as usual the setup of the partition layout. In the following example we have two hard drives: /dev/sda for the boot and the root partition and /dev/sdb for everything else. It is of course also possible to have another lvmpool instead of the sole root partition or having a lvmpool spanning over both hard drives, but let’s keep it simple for now.
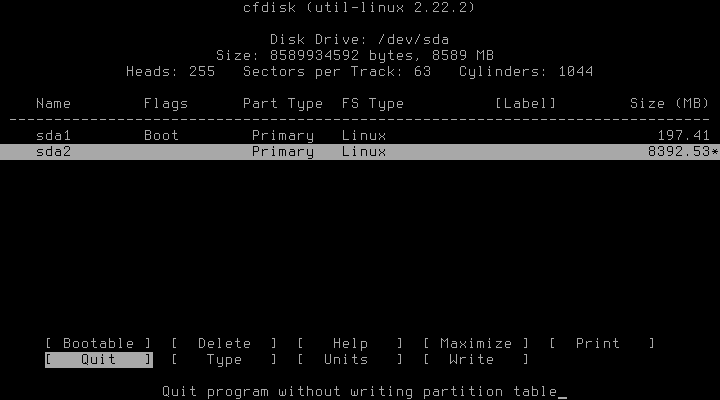
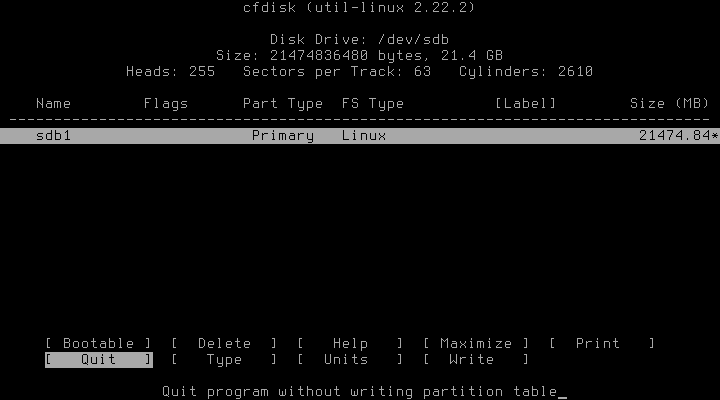
In the next steps we’ll encrypt both /dev/sda2, the root partition, and /dev/sdb1, the partition for LVM.
Step 1: Setting up the encrypted partitions
Now comes the crucial part of this guide: Encrypt all partitions in a way that enables us to decrypt both with a single passphrase entered at boot. The secret to achieving this state has a name: Keyfile.
Instead of encrypting both partitions with a passphrase, we’ll encrypt only /dev/sda2 with a passphrase and /dev/sdb1 with a keyfile. The keyfile will be stored on /dev/sda2 and is therefore only available if the passphrase as entered first. We’ll later configure the system that /dev/sdb1 is automatically decrypted as soon as the keyfile becomes available. Thus only one passphrase has to be entered to decrypt two partitions. Nice.
It might not be necessary to load the kernel module explicitly, but better safe than sorry:
# modprobe dm_cryptNow we encrypt /dev/sda2 with our encryption algorithm of choice:
# cryptsetup -c aes-xts-plain64 -s 512 -h sha512 -i 5000 -y luksFormat /dev/sda2I wont go over all arguments in detail, as they are explained in my guide and on the according man page. To encrypt /dev/sdb1 we first need a keyfile, 20KB of random data should be sufficient:
# dd if=/dev/urandom of=keyfile bs=1024 count=20Now we can use this keyfile to encrypt /dev/sdb1:
# cryptsetup -c aes-xts-plain64 -s 512 -h sha512 -i 5000 --key-file keyfile luksFormat /dev/sb1Finally we open our new partitions to start setting up the lvm:
# cryptsetup luksOpen /dev/sda2 crypt_root
# cryptsetup --key-file keyfile luksOpen /dev/sdb1 crypt_pool
Step 2: Setting up LVM
The time has come to setup LVM on crypt_pool. The crypt_root partition won’t be LVM treated, because it isn’t needed. Feel free to add LVM if you want to have the features or find the lack of symmetry disturbing, though.
Setting up the volumes is business as usual:
# lvm pvcreate /dev/mapper/crypt_pool
# lvm vgcreate lvmpool /dev/mapper/crypt_pool
# lvm lvcreate -L 5GB -n var lvmpool
# lvm lvcreate -L 1GB -n swap lvmpool
# lvm lvcreate -l 100%FREE -n home lvmpool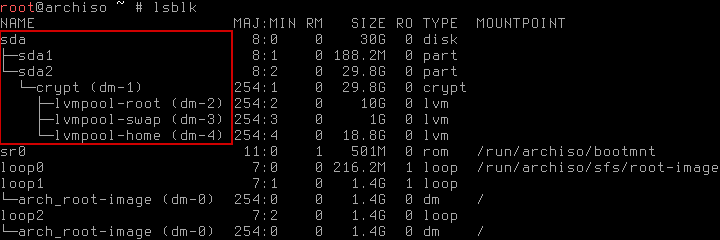
Step 3: Installing Arch Linux
Installing the base system contains no nasty surprises, thus let’s quickly format all partitions and get over with it:
# mkfs.ext4 /dev/sda1
# mkfs.ext4 /dev/mapper/crypt_root
# mkfs.ext4 /dev/mapper/lvmpool-var
# mkfs.ext4 /dev/mapper/lvmpool-home
# mkswap /dev/mapper/lvmpool-swap
# swapon /dev/mapper/lvmpool-swap
Be careful to mount everything in the right spot before starting pacstrap:
# mount /dev/mapper/crypt_root /mnt
# mkdir /mnt/boot
# mkdir /mnt/var
# mkdir /mnt/home
# mount /dev/sda1 /mnt/boot
# mount /dev/mapper/lvmpool-var /mnt/var
# mount /dev/mapper/lvmpool-home /mnt/home 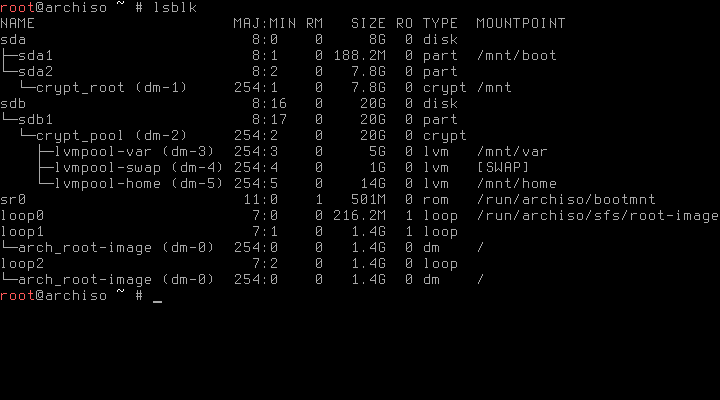
Step 4: Configuration
Before chrooting into the new installation we’ll setup the auto-decryption of the second hard drive. First we copy the keyfile to somewhere safe:
# cp keyfile /mnt/rootThen, we have to adjust the /mnt/etc/crypttab accordingly. Just add the following line:
crypt_hdd UUID=xyz /root/keyfile luksWhere xyz is the UUID of /dev/sdb1. If you don’t know it by heart, you can find it like this:
# ls -l /dev/disk/by-uuidBe careful to pick the right one! If at least one of your drives is a SSD, you might want to configure TRIM support to enhance the lifetime of your drive. Caution: Enabling TRIM support is a possible security issue. No matter what, we have to add the proper hooks to mkinitcpio.conf before generating the ramdisk:
HOOKS="base udev autodetect modconf block keymap encrypt lvm2 filesystems keyboard fsck"After installing the bootloader of choice (I’m using syslinux), we have to adjust its configuration, too. In /boot/syslinux/syslinux.cfg, the two APPEND entries for arch and archfallback have to be changed to
APPEND root=/dev/mapper/crypt_root cryptdevice=/dev/sda2:crypt_root ro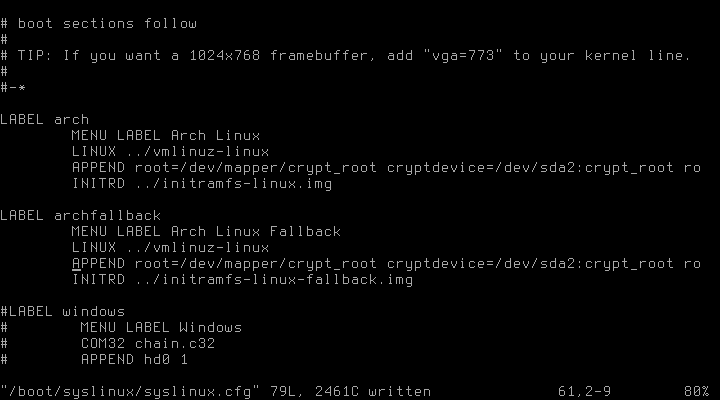
Sometimes (read: In the case of my notebook) the live cd assigns different device letters than your system later will, e.g. sdb and sdc instead of sda and sdb. This will lead to your system not getting past the boot loader at startup. In this case you’ll have to adress the ‘real’ partition in your syslinux.cfg instead of the partitions as seen by the live cd. Everything else (read: fstab and crypttab) adresses the drives by UUID, thus there shouldn’t be a problem.
That’s it! After unmounting all partitions and a subsequent reboot you should be greeted by a password prompt. It’s like single sign-on for encrypted partitions. Oh Yeah!